Apache Spark
Introduction
Apache Spark is a distributed general-purpose cluster computing system.
Instead of the classic Map Reduce Pipeline, Spark’s central concept is a resilient distributed dataset (RDD) which is operated on with the help of a central driver program making use of the parallel operations and the scheduling and I/O facilities which Spark provides. Transformations on the RDD are executed by the worker nodes in the Spark cluster. The dataset is resilient because Spark automatically handles failures in the Worker nodes by redistributing the work to other nodes.
In the following sections, we give a short introduction on how to prepare a Spark cluster and run applications on it in the context of the GWDG HPC system.
Running a Spark cluster in Slurm
Creating the Spark cluster
Info
We assume that you have access to the HPC system already and are logged in to one of the frontend nodes. If that’s not the case, please check out our introductory documentation first.
Spark can be loaded as a module. The default version at the time of writing is 3.5.1.
$ module load spark
$ spark-shell --version
Welcome to
      ____              __
     / __/__  ___ _____/ /__
    _\ \/ _ \/ _ `/ __/  '_/
   /___/ .__/\_,_/_/ /_/\_\   version 3.5.1
      /_/

Using Scala version 2.12.18, OpenJDK 64-Bit Server VM, 17.0.11
Branch HEAD
Compiled by user heartsavior on 2024-02-15T11:16:03Z
Revision fd86f85e181fc2dc0f50a096855acf83a6cc5d9c
Url https://github.com/apache/spark
Type --help for more information.
Since the resources of the HPC system are managed by Slurm, the entire setup has to be submitted as a job.
For this, we create a job script which sets properties of the job, loads Spark by its module and spawns the Spark workers.
Save the following example script as e.g. spark_job.sh.
Note
In this example, we set the different directories Spark uses to temporary storage that is removed after the job ends. Add commands to copy output you want to keep to persistent storage where the comments indicate to do so.
If you have a workspace on a fast shared filesystem (like the respective Lustre for your cluster island), you can use that directly.
#!/usr/bin/env bash

#SBATCH --job-name=Spark
#SBATCH --output=spark_job-%j.out
#SBATCH --error=spark_job-%j.err
#SBATCH --signal=B:SIGUSR2@60 # send signal SIGUSR2 60 seconds before the job gets terminated because of timelimit

set -euo pipefail

# on signal SIGUSR2, the function stop_spark gets called to gracefully terminate Spark
trap stop_spark SIGUSR2
stop_spark() {
	echo "Received signal SIGUSR2"

	echo "Stopping Spark workers..."
        # srun forwards signals to the processes it manages
        killall -v -w srun || echo "Failed to stop Spark workers" >&2

        echo "Stopping Spark master..."
        pkill -f org.apache.spark.deploy.master.Master || echo "Failed to stop Spark master" >&2

        # Here, code can be added to copy results and logs to permanent storage,
        # see https://docs.hpc.gwdg.de/how_to_use/storage_systems for recommendations
        # Depending on how much data you expect to generate, change the signal time accordingly
        echo "Done"
}

module load spark
export SPARK_HOME=${SPARK_MODULE_INSTALL_PREFIX}
export SPARK_CONF_DIR=${SPARK_HOME}/spark/conf

# https://docs.hpc.gwdg.de/how_to_use/storage_systems
export SPARK_WORKER_DIR=${SHARED_TMPDIR}
export SPARK_LOCAL_DIRS=${LOCAL_TMPDIR}
export SPARK_LOG_DIR=${SHARED_TMPDIR}

echo "Starting Spark master..."
${SPARK_HOME}/sbin/start-master.sh

echo "Starting Spark workers..."
export SPARK_NO_DAEMONIZE=1 # otherwise srun returns directly
srun ${SPARK_HOME}/sbin/start-worker.sh spark://$(hostname):7077 & # put in background, otherwise shell does not handle signals
wait
Now we can start the job. Choose a partition according to your cluster island:
$ sbatch --partition=standard96s --nodes=2 --time 0-02:00:00 --qos=2h spark_job.sh
In this case, the --nodes parameter has been set to specify a total amount of two worker nodes and --time is used to request a job runtime of two hours.
If you would like to set a longer runtime, beside changing --time, remove the --qos=2h parameter or change it to another QOS.
Using the Spark cluster
Once we have started deployment of our cluster, the job ID is reported back. We can use it to inspect if the job is running yet and if so, on which nodes:
$ squeue --jobs=12345678
             JOBID    PARTITION         NAME     USER  ACCOUNT     STATE       TIME NODES NODELIST(REASON)
          12345678  standard96s        Spark   u12345 intern_a   RUNNING       7:37     2 c[0339-0340]
The first node reported in the NODELIST column is running the Spark master.
Its hostname is used to form a URL like spark://host:port that the Spark applications, such as spark-submit and spark-shell, need to connect to the master.
$ spark-shell --master spark://c0339:7077
Spark context Web UI available at http://glogin11.usr.hpc.gwdg.de:4040
Spark context available as 'sc' (master = spark://c0339:7077, app id = app-20250915111927-0000).
Spark session available as 'spark'.
Welcome to
      ____              __
     / __/__  ___ _____/ /__
    _\ \/ _ \/ _ `/ __/  '_/
   /___/ .__/\_,_/_/ /_/\_\   version 3.5.1
      /_/

Using Scala version 2.12.18 (OpenJDK 64-Bit Server VM, Java 17.0.11)
Type in expressions to have them evaluated.
Type :help for more information.

scala>
Here, the Spark shell connects to the master on node c0339 and the default port 7077.
Scala code that is entered in this shell and parallelized with Spark will be automatically distributed across all nodes that have been requested initially. The URL of the application’s web interface, which is different from the master’s interface demonstrated below, is also reported in the startup message.
Stopping the cluster
Once the Spark cluster is not needed anymore, it can be shut down gracefully by sending the signal we have set up to be trapped in our job script above.
$ scancel -bs USR2 12345678
Access and Monitoring
Once your Spark cluster is running, information about the master and workers is being printed to a file of the form spark_job-$JOBID.out and spark_job-$JOBID.err in the current working directory you deployed the cluster from.
For example, in the case at hand, a built-in web interface that allows us to check the master for connected workers, the resources they provide as well as running applications and the resources they consume, is listening on the master on port 8080.
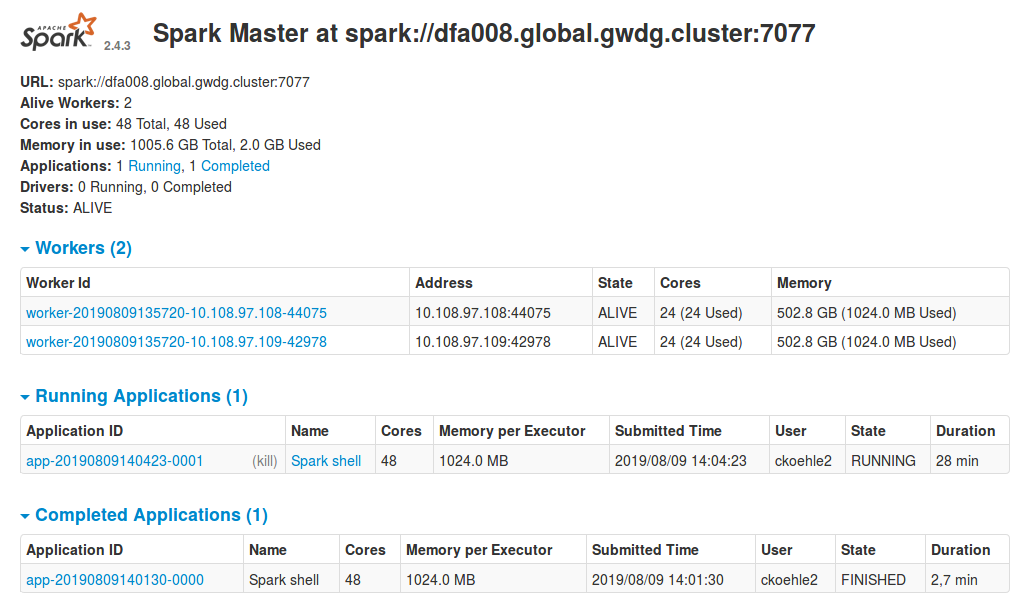
An SSH tunnel allows us to open the web interface in our browser via http://localhost:8080, by forwarding the remote port 8080 from the compute node running Spark to your local machine’s port 8080.
Run the following on your local machine, using a login node that matches your cluster island.
The tunnel is kept open until you terminate the command.
your_local_machine $ ssh -N -L 8080:c0340:8080 -l u12345 glogin-p3.hpc.gwdg.deExample: Approximating Pi
To showcase the capabilities of the Spark cluster set up thus far we enter a short Scala program into the shell we’ve started before.
val NUM_SAMPLES = 100

val count = sc.parallelize(1 to NUM_SAMPLES).filter { _ =>
  val x = math.random
  val y = math.random
  x*x + y*y < 1
}.count()

println(s"Pi is roughly ${4.0 * count / NUM_SAMPLES}")
The output should look similar to the following:
scala> println(s"Pi is roughly ${4.0 * count / NUM_SAMPLES}")
Pi is roughly 3.14163112
The local dataset containing the integers from 1 to 1E9 is distributed across the executors using the parallelize function and filtered according to the rule that the random point (x,y) with 0 < x, y < 1 that is being sampled according to a uniform distribution, is inside the unit circle. Consequently, the ratio of the points conforming to this rule to the total number of points approximates the area of one quarter of the unit circle and allows us to extract an estimate for the number Pi in the last line.