Managing a Project
A project’s members, description, classification and visibility can be managed in the HPC Project Portal. Management is restricted to members with the roles of PI and Delegate. For other operations and any problems, you can create a support ticket (see Getting Started to get the right email address). To manage projects in the HPC Project Portal, login and find the project you want to manage (see User Perspective). The project view and management actions are detailed in the sections below, with convenience links here:
- Project Classification
- Project View
- Adding a User
- Changing a User’s Role
- Deactivating a User
- Reactivating a User
- Managing User Restrictions
- Getting the Join Link
- Handling Join Requests
- Edit Project Name, Description, or Open/Closed
Note
Changes made in the HPC Project Portal do not take effect instantly on the clusters themselves. In the best case, it takes a few minutes after the first pause in doing management actions.
In the worst case, one action may jam on the cluster preventing the later ones from being performed. We monitor the HPC Project Portal system for these jams but may not notice them right away. If you notice that the changes haven’t been applied to the cluster after a long time and it hasn’t resolved, create a support ticket to bring it to our attention (see Getting Started to get the right email address).
First Time Login
Every user of the portal has to set their nationality. This is necessary to comply with export control regulations. Refer to User Perspective) for more details.
Project Classification Notification
Please note that due to export control requirements, it is necessary that you classify the nature of your work in the project. If we are unable to determine the classification, you will receive an email requesting that you classify your new project.
Notification of Unclassified Projects
After logging in, if there are any unclassified projects, a pop-up notification will appear notifying you that classification actions are required.
 or existing projects might be deactivated after a grace period.")
Popup that reminds of unclassified projects
Click on the Start button to see which projects need classification. If you do not classify them, you cannot use HPC (new projects) or existing projects might be deactivated after a grace period.
List of Unclassified Projects
If you click the “Start” button on the pop-up or select “Overview” > “Unclassified” of the active project list you will see a list of unclassified projects that you are PI for.

List of unclassified projects
Click on the View button to open the project details and classify it.
Unclassified Project Detail View
There is a red box telling you that you need to classify the project. It contains a link to edit and classify the project. New projects without classification will not get HPC access and no new members can be added to existing projects until the project is classified.

Detail view of an unclassified project
Click on the edit link to classify the project.
Classification of a Project
Please scroll down to the bottom of the page and select the type of account you have. Please note that the classification can only be set once. Please exercise caution when making a selection and feel free to provide feedback if necessary. Should you need to make a change, please contact our HPC support team. A warning box will appear prompting you to confirm.
On the bottom please provide the classification. Verify if your classification is correct and click the red confirm button.
Specify project classification

Confirm classification
After you finish these steps, you can manage your project as explained in the following sections.
Project View
The project view is the same as for users with the role Member (see User Perspective) except that extra management features are shown. An example is shown in the screenshot below.

Project Page for a PI
Project page for a project the user is a PI in. Names, usernames, and email addresses are blurred.
The project is shown in several boxes. If the project has sub-projects, the first box will be a list of the sub-projects. Then, a yellow box is shown if there are any pending join requests. Then, the next box is much like what is shown when browsing projects and includes the following information:
- In the top row
- Project name
- HPC Project ID
- “View the project actions file” button to see the history of the actions taken on the project
- Project start and end dates
- In the rest of the box from top to bottom:
- Project description
- Names of the PI/s
- Project path (where it is in the project tree, see Project Structure for more information)
- The “Share join link for this project” button to get the join link so you can share it with others
- The Edit button for changing the project description, making it an open/closed project, etc.
A box for adding new users to the project. It has a single button “Show form” which will make the form to add users visible.
A box of the active users/members of the project. They are presented as a table with each user’s name, Academic Cloud username, when they were added to the project, their project-specific username, and their role. On the right side of each row, an icon (three vertical dots) for the user management menu will appear if you have sufficient permissions to manage that user.
A box of the project’s deactivated users. They are presented as a table of each user’s name, Academic Cloud username, when they were deactivated, their project-specific username, and their role. On the right side of each row, an icon (three vertical dots) for the user management menu will appear if you have sufficient permissions to manage that user. Note that members who did not set their nationality yet, are added as deactivated user. They will be informed via email to add the setting. Once they set the nationality they will become active project member.
The last box shows the visitors who have requested to join the project in a table. On the right side of each row, there is an icon (three vertical dots) for processing the join request.
Restricted Projects
If the PI (or one of the PIs) of the project is affected by EU export control regulations, the restrictions of the PI will be applied to whole project. In that case, a warning label will be shown on top of the project view.

Warning Label for Restricted Projects
Warning label for projects that are restricted due to a PI being affected by EU export control regulations.
Adding a User
Users are always added with the Member role initially. You can change their role after they have been added.
In the “Manage Project Users” box, click on the “Add users to the project” button to make the forms to add a user visible. Then add the Academic Cloud usernames (e.g. johndoe1) or the email addresses associated with them (e.g. example.user@uni-goettingen.de) for each user you want to add in the provided text box, one user per line. Then click the “Add users” box. This is shown in the screenshot below.

Add User Form
Forms to add a user to the project, consisting of a text box to enter the Academic Cloud usernames or associated email addresses of the users and a button to add them.
Then, the project page reloads, and a success/failure box will eventually appear at the top of the page for each added user, which can be closed by clicking the “X” button on the right side of each. See the screenshot below for an example.

Add User Success Notification
Success notification for adding a user to the project.

Add User Successful But Nationality Missing
User added as pending member because the nationality is missing
Common reasons adding a user can fail:
- Person has not yet logged into the Academic Cloud at least once.
- The email address provided is not associated with the person’s Academic Cloud account.
- The Academic Cloud username does not exist
- A deactivated account is added, i.e. the account is locked. The portal will give an error message about it.
- The portal is overloaded
For the first, once the person has logged in at least once, you can attempt to add them again. For the second and third, check the email address or Academic Cloud username for typos, ask the person for the correct email address, or use their Academic Cloud username and then attempt to add them again. For the last one, it can help to resubmit the add request.
You can see the user with the missing nationality under deactivated members:

Deactivated users due to missing nationality
Users added without nationality will remain deactivated.
Once the invited member logs in and set the nationality it will become a regular project member.
Changing a User’s Role
To change an active user’s role, click the icon (three vertical dots) on the right hand side of the user’s row in the table to get the menu containing the management options, which are shown in the screenshot below. The icon will not appear if you lack the permissions to manage the user.

Active User Management Menu
Management menu for an active user allowing one to change their role or deactivate the user.
Then click the action for the role you want to give them. This will then bring up the confirmation form, which displays the user’s username and email address. Enter any reason, note, etc. in the provided text box, which will be logged into the action history of the project. Then click the “Set PREVIOUSROLE to NEWROLE” button to change their role, or “Abort” to cancel. The form is shown in the screenshot below.

Change Role Form
Form for changing the role of an active user with a text box to enter the reason, notes, etc. and buttons to do the change or cancel.
Deactivating a User
Users can be deactivated, which
- Removes them from the project’s Slurm account
- Disables login with their project-specific username
The project-specific username and all the users’ files are retained for several months in case a PI or Delegate reactivates them.
To deactivate a user, click the icon (three vertical dots) on the right hand side of the user’s row in the table to get the menu containing the management options, just like for changing a user’s role. The icon will not appear if you lack the permissions to manage the user. Then click the “Deactivate” action. This will then bring up the confirmation form, displaying the user’s username and email address. Enter any reason, note, etc. in the provided text box which will be logged into the action history of the project. Then click the “Deactivate this member” button to deactivate them, or “Abort” to cancel. The form is shown in the screenshot below.

Deactivate User Form
Form for deactivating an active user with a text box to enter the reason, notes, etc. and buttons to do the change or cancel.
Reactivating a User
To reactivate a deactivated user, go to the table of deactivated users and click the icon (three vertical dots) on the right hand side of the user’s row in the table to get the menu containing the management options, which are shown in the screenshot below. The icon will not appear if you lack the permissions to manage the user.

Deactivated User Management Menu
Management menu for a deactivated user, allowing one to reactivate the user.
Then click the “Reactivate” action. This will then bring up the confirmation form, displaying the user’s username and email address. Enter any reason, note, etc. in the provided text box, which will be logged into the action history of the project. Then click the “Reactivate this member” button to reactivate them, or “Abort” to cancel. The form is shown in the screenshot below.

Reactivate User Form
Form for reactivating an active user with a text box to enter the reason, notes, etc. and buttons to do the change or cancel.
Managing User Restrictions
Project members affected by EU export control regulations are listed in the Restricted Members section. This list is not visible to regular users, it is only displayed for the PI of the project, their Delegates and GWDG employees.

Restricted Members
Lists all project members affected by EU export control regulations.
Lifting User Restrictions
The PI of a project can lift the restrictions applied to a user. A valid reason for why the restrictions should be lifted has to be specified. The PI is responsible for the compliance of their project members and for the truthfulness of their statements.
To lift the restrictions for a user, click the “Lift restrictions” button next to the respective user in the Restricted Users list. A dialog with a text box will appear, where you should state your reasons for lifting the restrictions applied to that user. Click the green “Lift restrictions” button to confirm and perform the action.

Lift Restrictions Button
Restricted Users table with highlighted button to lift a user’s restrictions.

Lift Restrictions Dialog
Dialog to lift restricions of a user, shows previous comments on the user and contains text box to provide a reason for lifting restrictions of the user.
Lifting Restrictions from the PI and Delegate Roles
The person managing a project cannot lift restrictions on their own HPC user id or those on other members with the roles of either PI or Delegate. If you need to lift these restrictions, please contact our support team.
Lifting of Restrictions for a Whole Project
If the PI is restricted, the same restrictions apply to all project members. A banner near the top of the project page informs users about such project-wide restrictions. It is not possible to lift these restrictions by yourself. If you have reason to believe that the restrictions should be lifted, please contact our support team.

Restricted Project Example
Example of a restricted project banner. If an orange or red banner appears at the top of the project, the entire project is affected by the restriction.
Reapplying User Restrictions
The PI can also reapply restrictions of a user. Click the “Reapply Restrictions” button to show the restriction status dialog again. You can see previously added comments including the reasons for lifting the restrictions of that user. Please also specify a reason for reapplying the restrictions in the text box. To confirm and reapply the restrictions, click the “Reapply restrictions” button.

Reapply Restrictions Button
Restricted Users list with highlighted button to reapply user restrictions.

Reapply Restrictions Dialog
Dialog to reapply restricions of a user, shows previous comments on the user and contains a text box to provide a reason for reapplying restrictions of the user.
Getting the Join Link
Every project has a join link that people can use to request to join the project. For non-open (“closed”) projects, only PIs and Delegates can get this link. To get it, click on the “Share join link for this project” button below the project description. A form, shown in the screenshot below, will pop up with the join link, a “Copy the link” button to copy it into your clipboard, and a “Close” button to close the form.

Join Link Form
Form for getting the join link, which includes a convenient button to quickly copy it to your clipboard.
Handling Join Requests
Pending join requests are shown in the table in the bottom box, “Non-verified users”. To approve or reject joining the project, click the icon (three vertical dots) on the right hand side of the user’s row in the table to get the menu containing the management options. The icon will not appear if you lack the permissions to manage the user. The only option is to handle the request, which must be clicked. This will then bring up the option to approve or reject, which will display their Academic Cloud username, the message they entered in their join request, and the date and time they made their join request. Enter any reason, note, etc. in the provided text box which will be logged into the action history of the project. The click “Reject this application” to reject the request or “Approve this application” to approve it. If approved, they will get the role of Member. The form is shown in the screenshot below.

Join Request Approval/Rejection Form
Form for approving or rejecting a request to join the project with a text box to enter the reason, notes, etc. and buttons to approve or reject.
Exporting the project users as CSV
You can export the project users as CSV under the box “Manage Project Users” by clicking on the “Export project users as CSV” button. It will start the download of the CSV. The CSV will include the names, email addresses, project user names, the date when they have been added, the role and the status. Deactivated users will be exported as well, but with the status incative. Project visitors will not be exported.

Export project users as CSV
Manage Project Users box with the Export Project users as CSV button
Edit Project Name, Description, or Open/Closed
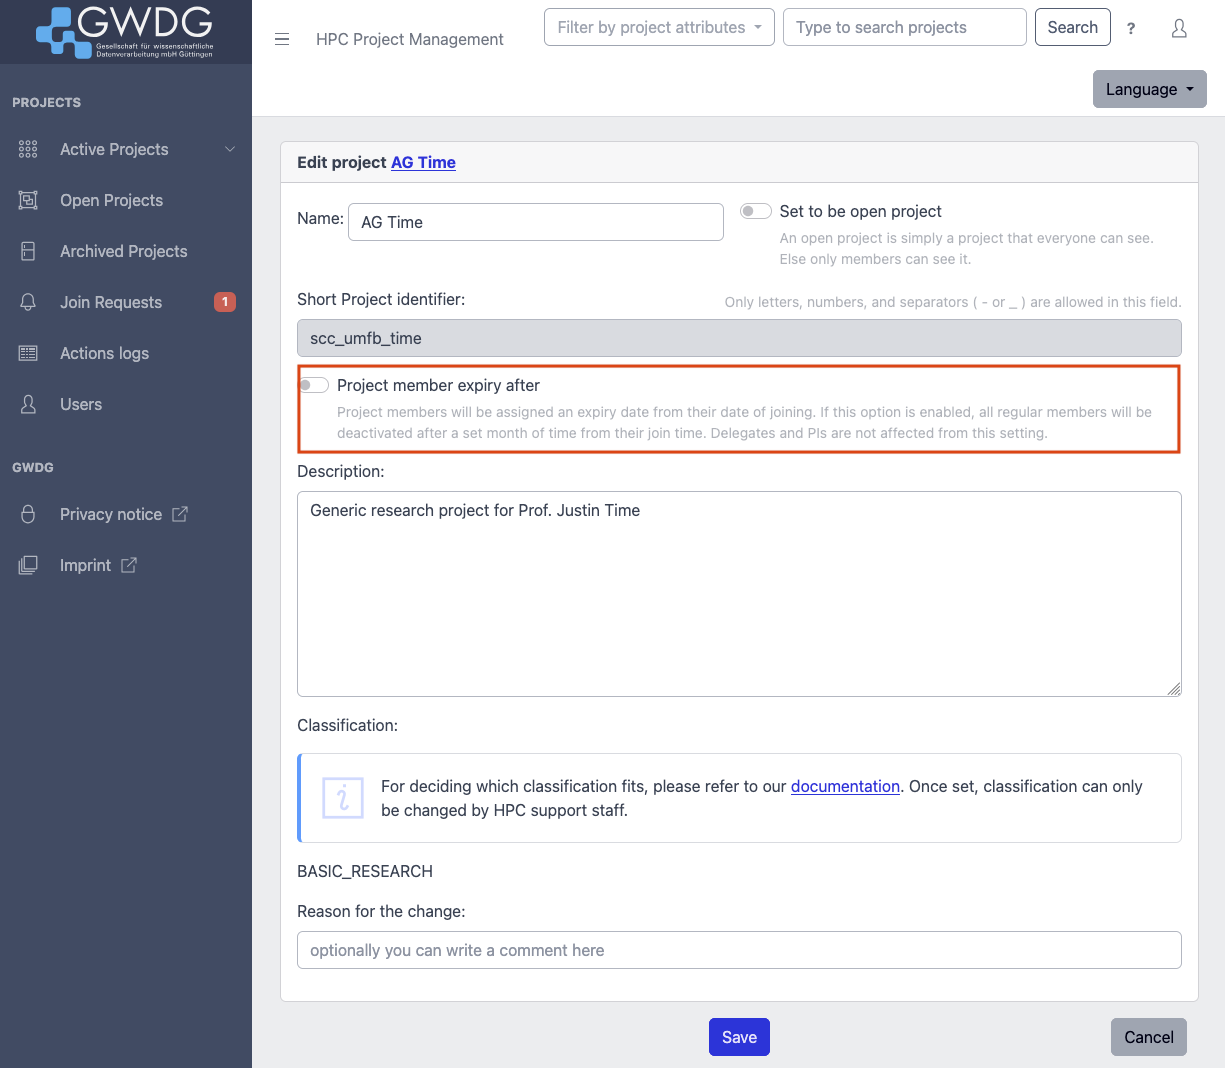
Users with the PI role may edit the name and description of a project or change whether it is open (visible to all users that open the project portal which can then request to join) or closed. Open projects are visible on the top left with the “Open Projects” link. Click the “Edit” button below the project description to bring up the page for editing the project, which is shown in the screenshot below. Text boxes are provided to change the project’s name and description. There is also a toggle to set whether the project is open or closed. It is also possible to add more users to the project. After making any desired changes, click the “Submit” button at the bottom. The function project member expiry after is explained in the next section.

Edit Project Form
Form for changing a project name or description, changing it to an open/closed project, and adding more members.
Enable Custom User Expiration
As default added members have computing access until the projects ends, or until members are manually deactivated by the PI. There is also an option to set an expiration period or date after which members are automatically deactivated. This could be useful, for example, when persons work only temporarily on this project. The PI can enable this option via the project settings. Click on “Edit” a project (see section above) and switch on “Project member expiry after”:
Edit project
")
Enable custom user expiration
Switching on custom user expiration and setting a default expiration in months (in this example 6 months)
After you used the toggle switch to enable this feature you need to enter a default user expiration period in months. Attention: This date always counts from the date when a user has been added (not from when this option was enabled). All regular members will get the custom expiration date set (not PIs and Delegates). If there are existing users that had been added before this time span they might get deactivated. You will see a warning message that informs you about that fact. Members can be reactivated again as described on the section Reactivating a User. In a second step the PI can also set custom expiry dates for individual project members (see below).
After enabling the expiry date option the table with Active project members has two new columns: “Custom Expiry” and “Expires on”. “Custom Expiry” means if a custom expiry date for this member has been set. If it follows the default project expiry setting (described above), this value will be “No”. If a custom expiry date for this member has been set (see below), this value will be “Yes”. “Expires on” shows the expiration date.

Project user list after enabling custom user expiry
Project User list after enabling custom user expiration
If you want to change or disable the expiration date of a regular project member, click on the three dots next to the member and choose “Set custom expiry”:

Set custom user expiry
Open the custom user expiry modal dialog
After clicking on “Set custom expiry” the following dialog opens:

Change custom user expiry
Dialog for setting custom user expiry options or unsetting custom user expiration
On this dialog you have the following options:
- “Extend the membership by” certain months. It takes the current expiration date of the user and adds the entered months to that date
- “New expiration date:” allows you to set an exact date when an account will be deactivated*
- “Set date” applies the new expiration period or date
- “Abort” closes the dialog without changing anything
- “Unset custom expiration” disables the custom expiration date for this member. The project member will be deactivated when the project ends
If the date is later than the project end date, the expiration date will be set to the project end date. The functionality to set custom expiry dates per-user can be disabled when editing the project. The custom expiration date will be removed from all project members.