GPU Usage
Step-by-Step guide
If you would like an overview guide on this topic, we have a Youtube playlist to set up and run an example deep learning workflow. You can follow along our step-by-step guide. Note: The content of this guide is outdated.
Partitions and Hardware
There are multiple partitions with GPU nodes available. You will only have access to some of them, depending on what type of user account you have. An overview of all nodes with GPUs can be displayed by running the following command from a frontend node:
sinfo -o "%25N %5c %10m %32f %10G %18P " | grep gpuFor more details, see GPU Partitions.
Which Frontend to Use
Of the different login nodes available, we have two (glogin9 and 10, it is recommended to use the DNS alias glogin-gpu.hpc.gwdg.de) dedicated to run GPU workloads. These are the closest match to the hardware of our GPU nodes, so it is strongly recommended to use them when writing and submitting GPU jobs and especially when compiling software. While it is technically possible to do so from the other login nodes as well, it is not recommended and may cause problems. For example, a lot of GPU-specific software modules are not even available on other login (or compute) nodes.
Getting Access
Nodes can be accessed using the respective partitions.
On the shared partitions (see GPU Partitions), you have to specify how many GPUs you need with the -G x option, where x is the number of GPUs you want to access.
If you do not use MPI, please use the -c #cores parameter to select the needed CPUs.
Note that on non-shared partitions, your jobs will use nodes exclusively as opposed to sharing them with other jobs.
Even if you request less than i.e. 4 GPUs, you will still be billed for all GPUs in your reserved nodes!
Note that on the partitions where the GPUs are split into slices via MIG, -G x requests x slices. To explicitly request an 80GB GPU please add the option --constraint=80gb to your jobscript.
Example
the following command gives you access to 32 cores and two A100 GPUs:
srun -p grete:shared --pty -n 1 -c 32 -G A100:2 bashIf you want to run multiple concurrent programs, each using one GPU, here is an example:
#!/bin/bash
#SBATCH -p grete
#SBATCH -t 12:00:00
#SBATCH -N 1

srun --exact -n1 -c 16 -G1 --mem-per-cpu 19075M  ./single-gpu-program &
srun --exact -n1 -c 16 -G1 --mem-per-cpu 19075M  ./single-gpu-program &
srun --exact -n1 -c 16 -G1 --mem-per-cpu 19075M  ./single-gpu-program &
srun --exact -n1 -c 16 -G1 --mem-per-cpu 19075M  ./single-gpu-program &
wait
More explanation for the above example can be found here.
Requesting GPUs
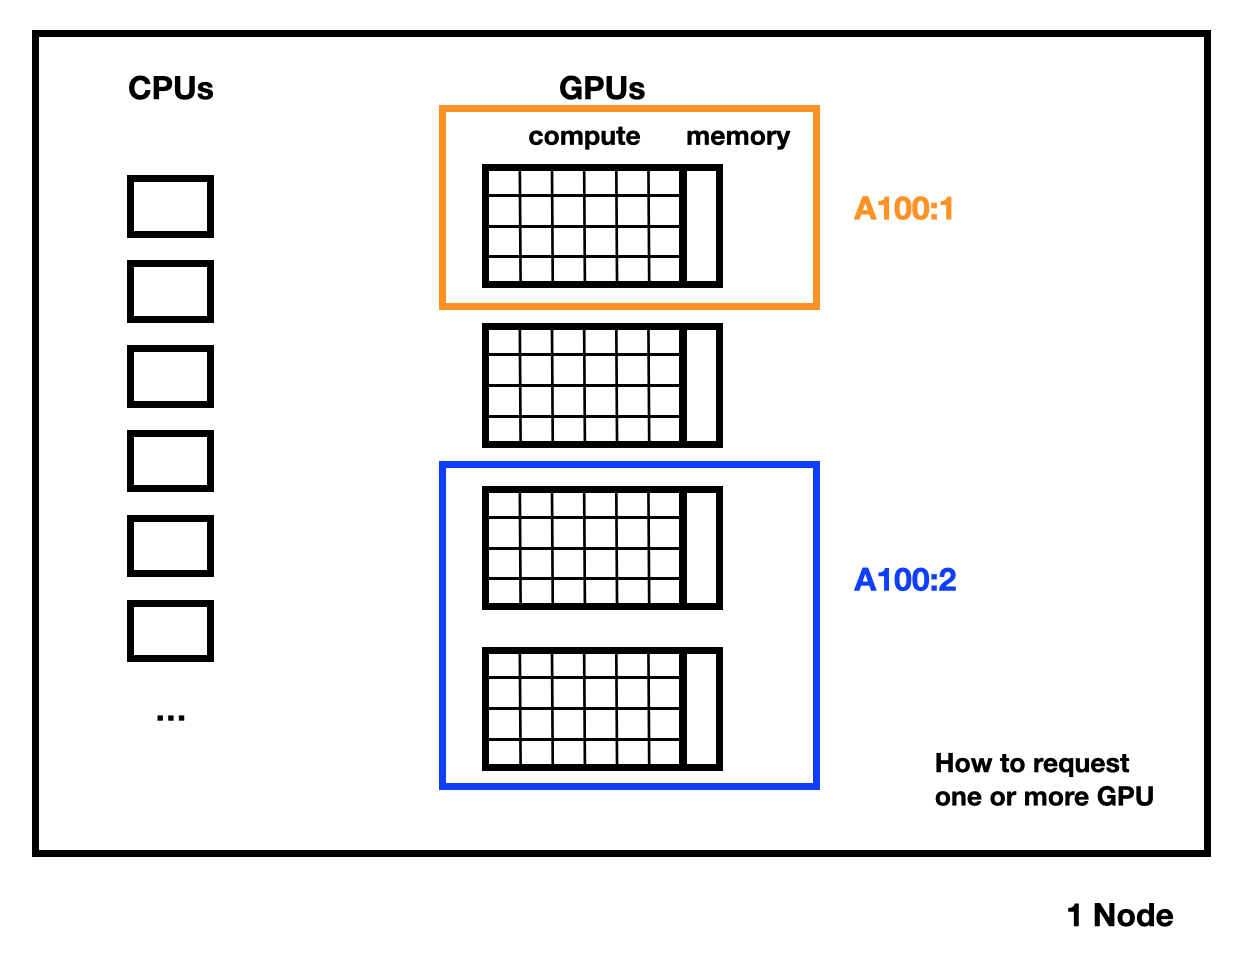
Each Grete node consists of 4 A100 GPUs with either 40 GiB or 80GiB of GPU memory (VRAM), or 8 A100 GPUs with 80 GiB of VRAM (only in grete:shared).
In these partitions, you can only request whole GPUs.
- On non-shared partitions (e.g.
grete,grete-h100, …) you automatically block the whole node and all four GPUs on it. Important: Unless your job also requests the four GPUs (e.g.-G A100:4), these are blocked by you (and billed to your core-hour limit), but not accessible to your job. Be sure to always request all four GPUs when submitting a job on these partitions, or use the shared partitions. These partitions are best suited for very large jobs. There are no nodes with 8 GPUs in this partition. - Other GPU partitions are shared, you can choose how many GPUs you need. Requesting less than four (or eight) GPUs means more than one job can run on a node simultaneously (particularly useful for job arrays).
It is possible to request less or more system memory than the default.
If you wanted 20GiB of RAM, you could use the additional Slurm argument --mem=20G.
We recommend to not explicitly request memory or CPU cores at all, in most cases Slurm will assign an appropriate amount, proportional to the number of GPUs you reserved.
Warning
Make sure to be fair and to not use more than your proportional share of system memory or CPU cores!
For example, if you only need 1 GPU, you should only use up to a fourth of usable memory (see below for details). See the tables on this page for the hardware specifications of nodes in each partition. If you request too much, there are not enough resources left to schedule other jobs, even though there are unsused GPUs in a node (unless someone goes out of their way to explicitly request less than the default share of CPU cores or memory).
It is important to note that you can’t just divide the value in the RAM per node column by 4! A few GiBs of memory are reserved by the hardware for book keeping, error correction and such, so of 512GiB, the operating system (OS) usually only sees 503GiB for example. The OS itself needs some memory to function correctly, so Slurm usually reserves around 20GiB for that. This means that the maximum amount of memory actually usable for jobs is only ~480GiB for a 512GiB RAM node.
The example script below requests two A100 GPUs:
#!/bin/bash

#SBATCH --job-name=train-nn-gpu
#SBATCH -t 05:00:00                  # Estimated time, adapt to your needs
#SBATCH --mail-type=all              # Send mail when job begins and ends

#SBATCH -p grete:shared              # The partition
#SBATCH -G A100:2                    # Request 2 GPUs

module load miniforge3
module load gcc
module load cuda
source activate dl-gpu               # Replace with the name of your miniforge/conda environment

# Print out some info.
echo "Submitting job with sbatch from directory: ${SLURM_SUBMIT_DIR}"
echo "Home directory: ${HOME}"
echo "Working directory: $PWD"
echo "Current node: ${SLURM_NODELIST}"

# For debugging purposes.
python --version
python -m torch.utils.collect_env
nvcc -V

# Run the script:
python -u train.py
Interactive Usage and GPU Slices on grete:interactive
Whole A100 GPUs are powerful, but you might not need all the power.
For instance, debugging a script until it runs might require a GPU, but not the full power of an A100.
To this end, the grete:interactive partition is provided.
The idea is that you can come into the office, log into the cluster, and use this for development and testing.
When you are confident your script works, you should submit larger workloads as a “hands-off” batch job, making use of one or more full GPUs (multiples of 4 for grete).
The interactive partition contains A100 GPUs that are split into slices with the NVIDIA Multi-Instance-GPU (MIG) technology. Each GPU slice consists of a computation part (a subset of the streaming multiprocessors) and some memory.
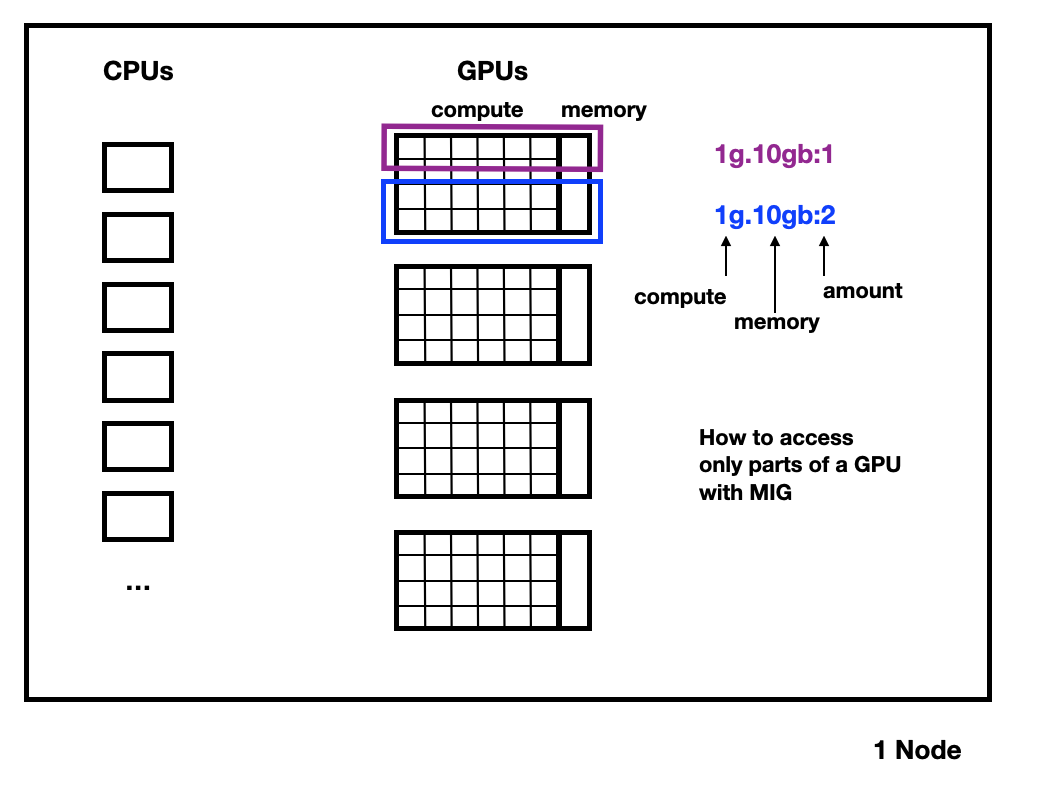
An A100 for example can be split into 7 compute units comprised of 14 streaming multiprocessors (SMs) each. When using MIG, 10 of the 108 SMs are used for management and are not available for compute. For example, we currently split the 80GiB A100s into six 1g.10gb slices and one 1g.20gb slice, which means that each split has one compute unit (“1g”) and 10 GiB or 20 GiB of GPU memory (VRAM). For an interactive node that has 4 such A100 GPUs, this means there are in total 28 slices per node.
The configuration of MIG slices might be subject to change, depending on the load of the cluster and requirements reported to us by our users.
Use scontrol show node <nodename> to see the type and number of slices a node currently offers.
MIG slices are configured by an administrator and can not be changed by job scripts, you have to pick one of the sizes on offer.
Instead of requesting a whole GPU with e.g. -G A100:n, as you would in the other GPU partitions, you request MIG slices in the same format Nvidia uses, i.e. -G 1g.10gb:n.
The :n for the count of slices at the end is optional, if you don’t specify it, you will get one such slice.
At the moment, that is also the maximum allowed for grete:interactive.
The following interactive Slurm example requests a 1g.10gb slice:
srun --pty -p grete:interactive -G 1g.10gb /bin/bashMonitoring
Once you submitted a job, you can check its status and where it runs with
squeue --meIn Your Script
Many packages that use GPUs provide a way to check the resources that are available. For example, if you do deep learning using PyTorch, you can always check that the correct number of resources are available with torch.cuda.is_available().
Note that in PyTorch, the command torch.cuda.get_device_name() does not work with Nvidia-MIG splited GPUs and will give you an error.
Using nvitop
To monitor your resource usage on the node itself, you can use nvitop.
- Check where your job runs with
squeue --me - Log into the node. For instance, if your job runs on ggpu146, use
ssh ggpu146 - On the node, run
module load py-nvitop
nvitop
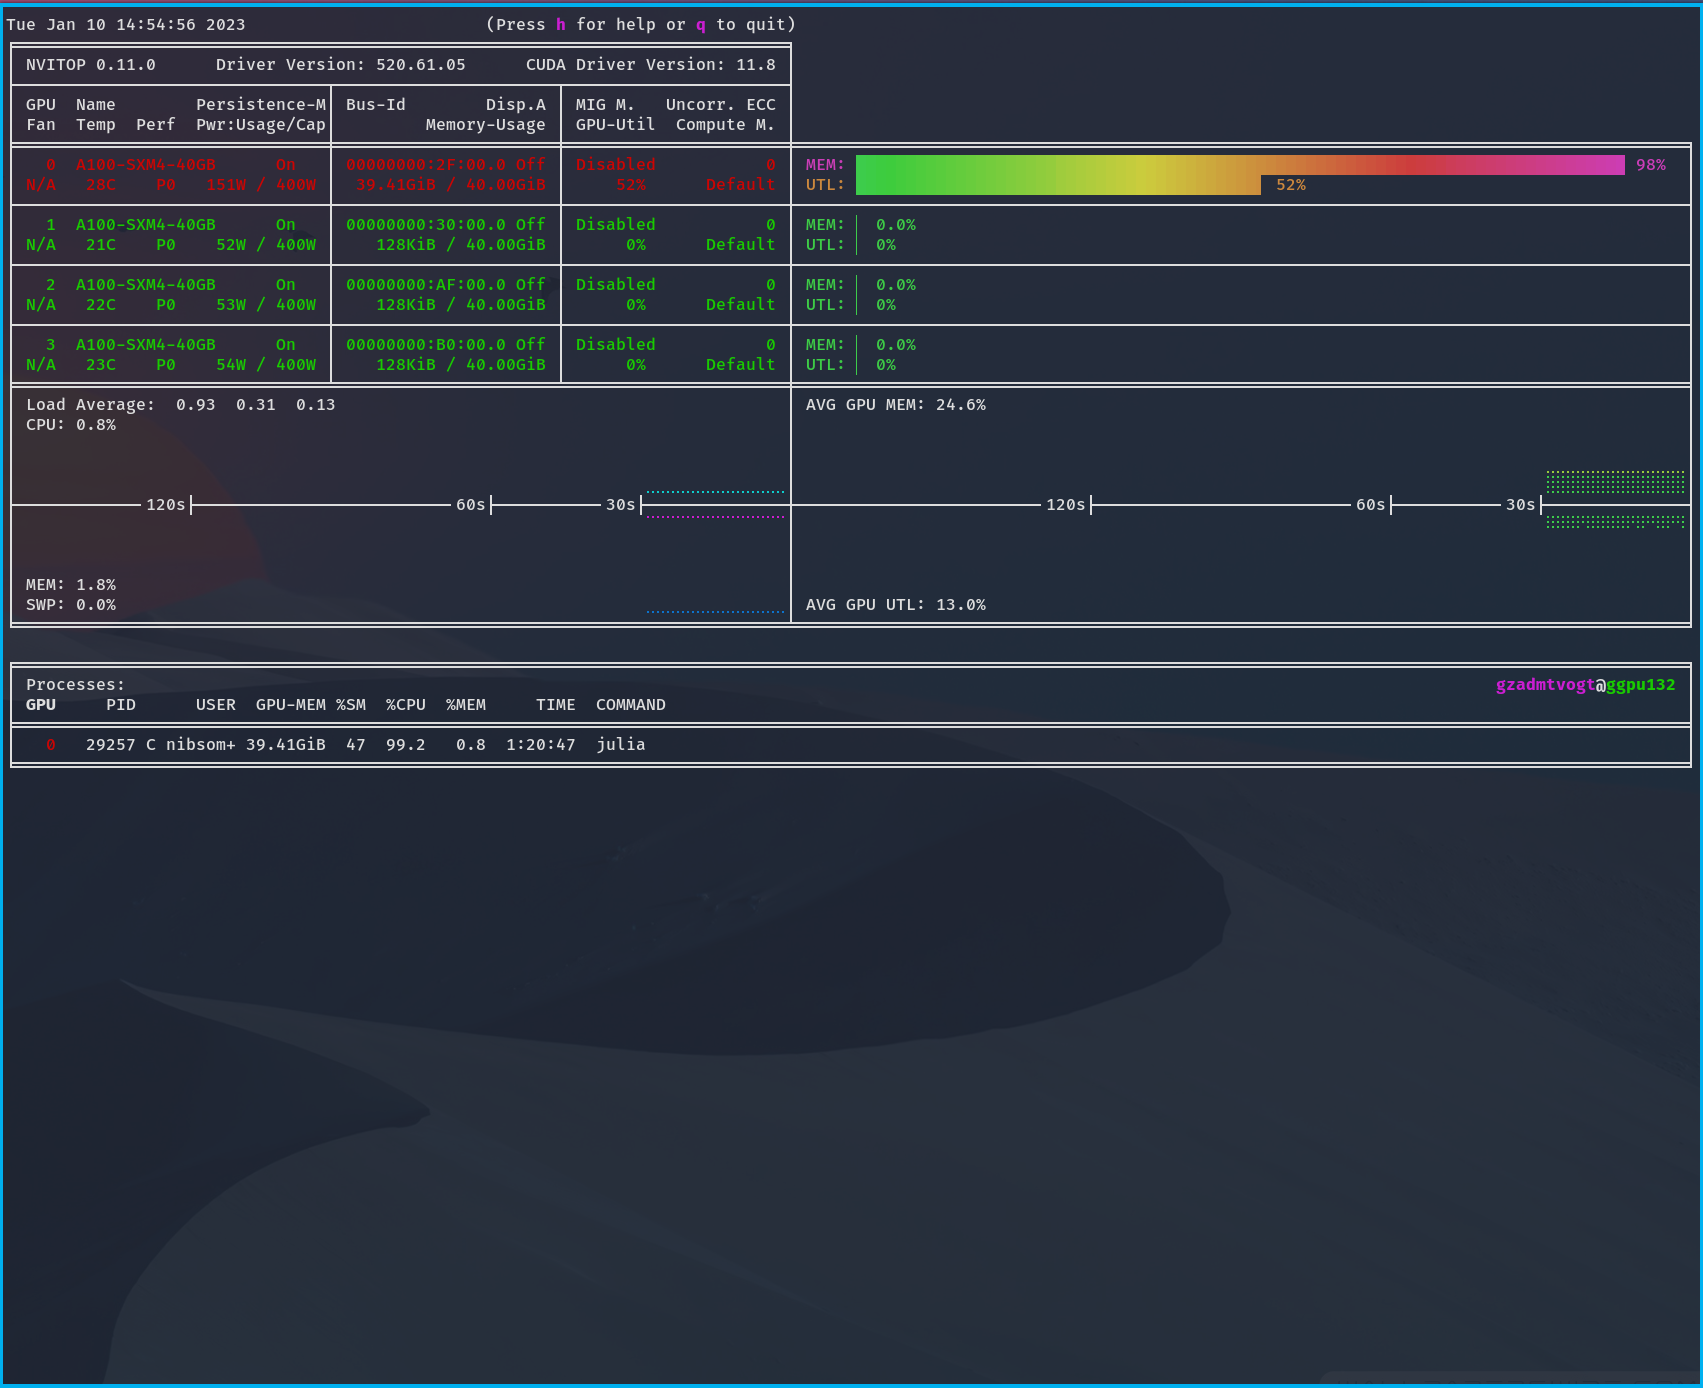
In this example output, you can see your
- GPU compute usage/utilization (top) as UTL
- GPU memory usage (top) as MEM
- your CPU usage (bottom) with your abbreviated user name.
Software and Libraries
Cuda Libraries
To load CUDA, do
module load gcc/VERSION cuda/VERSIONIf you don’t specify the VERSION, the defaults (12.6.2 for cuda) will be used.
Note
Due to the hierachical nature of the module system, you can only load the cuda module after the corresponding version of the compiler, in this case gcc, has been loaded.
Use module spider cuda to see all available versions, followed by module spider cuda/VERSION to see which gcc version has to be loaded before a given cuda version.
Nvidia HPC SDK (Nvidia compiler)
The full Nvidia HPC SDK 23.3 is installed and useable via the modules nvhpc/23.3 nvhpc-byo-compiler/23.3 nvhpc-hpcx/23.3 nvhpc-nompi/23.3.
This SDK includes the Nvidia compiler and the HPC-X OpenMPI and several base libraries for CUDA based GPU acceleration.
Using MPI and other communication libraries
We have several CUDA enabled OpenMPI versions available. We have the HPC-X OpenMPI in the module nvhpc-hpcx/23.3, the regular OpenMPI 3.1.5 from the Nvidia HPC SDK in nvhpc/23.3 and the OpenMPI included in the Nvidia/Mellanox OFED stack, provided by the module openmpi-mofed/4.1.5a1.
Additional the libraries NCCL 12.0, NVSHMEM 12.0 and OpenMPI 4.0.5 are available as part of the Nvidia HPC SDK in /sw/compiler/nvidia/hpc_sdk/Linux_x86_64/23.3/comm_libs/.
Singularity/Apptainer Containers
Apptainer (see Apptainer (formerly Singularity)) supports “injecting” NVIDIA drivers plus the essential libraries and exectuables into running containers. When you run SIF containers, pass the --nv option. An example running the container FOO.sif would be:
#!/bin/bash
#SBATCH -p grete:shared              # the partition
#SBATCH -G A100:1                    # For requesting 1 GPU.
#SBATCH -c 4                         # Requestion 4 CPU cores.

module load apptainer/VERSION
module load gcc/GCCVERSION
module load cuda/CUDAVERSION

apptainer exec --nv --bind /scratch FOO.sif
where VERSION is the desired version of Apptainer, GCCVERSION the necessary prerequisite gcc version for your chosen version of cuda and CUDAVERSION is the specific version of CUDA desired.
For more information, see the Apptainer GPU documentation.
Using Conda/Mamba/Miniforge
Conda (replaced on our clusters by miniforge3) and Mamba are package managers that can make installing and working with various GPU related packages a lot easier. See Python for information on how to set them up.
Training Resources (Step-by-Step)
We have regular courses on GPU usage and deep learning workflows. Our materials are online for self-studying.
- A deep learning example for training a neural network on Grete: https://gitlab-ce.gwdg.de/dmuelle3/deep-learning-with-gpu-cores
- Example GPU jobs are being collected at https://gitlab-ce.gwdg.de/gwdg/hpc-usage-examples/-/tree/main/gpu